
Understanding the different stages of clay is essential as you begin to craft your first pots, plates, bowls and other decorative items. Although a large number of potters do not apply a fixed system for classifying their work in various stages after throwing, many others create a stage classification that helps them to effectively track the progress of their work from start to finish.
Learning the stages of clay is part of understanding how to work with what you have.
Table of Contents
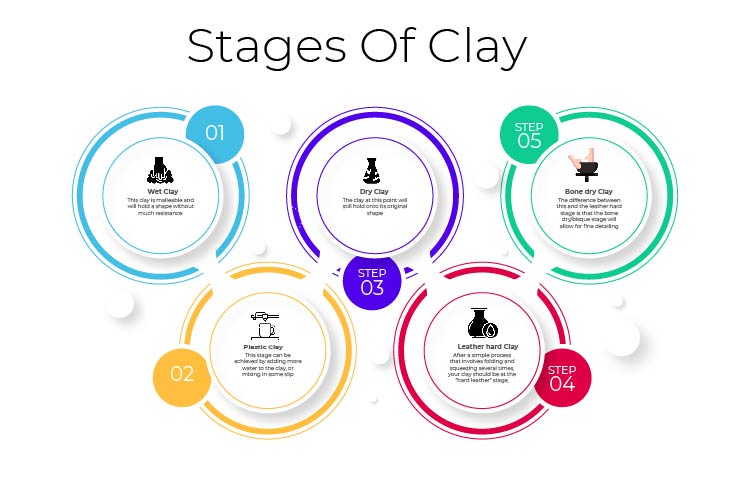
Here is a list of six different stages of clay.
1. Wet Clay
The stage of clay known as “wet” is the first step in working with clay, and can also be referred to as being “fresh.” This clay is malleable and will hold a shape without much resistance.
Most models start out at this stage before continuing onto other stages that require more work.
2. Plastic Clay

The next step after “wet” is “plastic.” This stage can be achieved by adding more water to the clay, or mixing in some slip (potter’s term for a thinner consistency of clay). This process will make it easier to shape and trim excess material from your work.
3. Dry Clay
The next step after the plastic stage is the “dry” stage. Once this has been achieved, you can begin working with tools to create marks on the clay. The clay at this point will still hold onto its original shape, however it will require more effort as you carve out section and build them up as needed. At this point you are typically using needles and other non-cutting tools for carving or modeling work.

4. Leather hard Clay

In order for clay to be stable enough to work with its texture will need to be altered through various methods of molding and wedging. After a simple process that involves folding and squeezing several times, your clay should be at the “hard leather” stage, which is basically dry but still maintains a moist surface.
At this stage of working with clay you can begin cutting into patterns using knives and other sharp tools.
Once the work has been cut, the potter can return to “wet” clay stage once again. This is where you’ll begin shaping your work using wooden tools and other implements.
5. Bone dry Clay
The next stage of working with clay is called “bone dry,” and it’s also known as bisque. The difference between this and the leather hard stage is that the bone dry/bisque stage will allow for fine detailing that would otherwise be impossible while it was still in its wet form.

At this point, any modifications should be done quickly so as not to add any extra water to the clay which could cause warping or other deformations. Keep in mind that this process varies depending on how you intend to use your finished piece; if you plan to paint your work, you’ll need to let it dry completely before proceeding, which may take up to two weeks.
6. Glazeware
After the piece has dried, you can begin preparing it for the final firing stage. This can be done by coating it with a clear glaze, which will give it a smooth finish and protect it from dirt and other contaminants. The firing clay process will also harden the clay and make it resistant to scratches and chips.
There are many different stages of clay, but these are some of the most common. If you’re a beginner with clay, it’s a good idea to learn the various stages of clay and how they affect your work. These simple terms will help you better understand what is going on with your project, especially when changing from one stage to another.
In the next article I will talk about some different types of clay that are used in different ways throughout the pottery process.
It is important to prevent the clay from cracking because cracks weaken the structure of the clay and can cause the finished piece to break or crumble. Cracks can also ruin the appearance of the piece and make it less desirable. By carefully managing the drying process and taking steps to prevent cracking, you can ensure that your clay remains strong and intact and that your finished piece is of the highest quality.
Conclusion:
In this article, you were introduced to the different stages of clay. It’s important to know how to handle these stages as you go about working with a project, whether it is a simple model or a fully-formed piece of pottery. Knowing where your work stands in terms of stage will help you make adjustments and alterations more precisely and effectively as they’re needed. In the next article I will talk about some different types of clay that are used in different ways throughout the pottery process.

Hi, my name is Stefanie and I am a potter from USA. Clay has given me the opportunity to be creative and personalize everyday objects like cups, bowls, plates, and more.
I love working with clay because it’s so malleable. You can make anything you want out of it; there are no limits!